
Why I Switched From ConvertKit to MailerLite
When I first began my side hustle journey I was eager to learn all there was to know. One thing that continually popped up was the need for an email provider.
An email provider is essential for building an online business because it allows your to do three key things.
It’s a system, that once set up, can help your side hustle run itself. Ever since I’ve been on a search for a tool that could take the best features of the most popular programs and combine them all into one.
MailerLite vs. Mailchimp
I needed an email platform that had the ease, aesthetics, and price of Mailchimp, but without the complicated limitations when creating multiple email welcome sequences. Plus I didn’t want one person, who was interested in various topics, to count as multiple subscribers (which would quickly hike up the price and make a list seem larger than it actually was).
MailerLite vs. ConvertKit
But I also needed a program that could provide the segmentation, automation, sequencing, and subscriber based features like ConvertKit, but without the high starting price of $29 a month for under 1000 subscribers. That’s a high amount to pay when you’re just starting out (though I paid it for over a year!).
Not to mention the fact that is is a “less attractive” platform. I was a brand identity designer for 2+ years, so not having the ability to make it perfectly compliment my brand was always a huge con for me. I had my workarounds, but usually the only way to jazz it up was through code that never seem to work just right. I like why the company was founded and who it was founded by, but ConvertKit sadly didn’t check all the boxes for me.
MailerLite vs. Leadpages
And I also needed a tool that could create landing pages and clickable email sign up pop-up boxes like Leadpages, but once again without the price. The high price of $37 a month is a lot to pay monthly, especially considering I create most of my landing pages in Squarespace.
*See related: 7 Reasons Squarespace is the Best Tool for Your Business.
All that said, I finally found a tool that checks off all the boxes for me, and it’s called MailerLite.

Why I Prefer MailerLite over ConvertKit, Mailchimp, Leadpages, and all the other email marketing platforms out there.
The reasons why I prefer MailerLite over the others essentially boils down into three important categories which are Cost, Customization, and Features. The alliteration nerd in me wanted to find another “C” (like components), but features really just makes the most sense. ;p
The Affordable Cost of MailerLite
The cost of MailerLite is extremely affordable, especially when you’re just starting out. If you have under 1000 email subscribers the cost is free! So while you’re building up your email list you don’t have to pay a dime. And what’s even better is that ALL FEATURES ARE AVAILABLE TO YOU. I mean, one of the benefits of having an online business is the ability to keep overhead low, and ti’s best to use tools that can scale with you.
The only caveat to the free option is that a greyed MailerLite icon appears at the bottom of the emails you send. But because of it’s subtle coloring, it doesn’t detract from your brand at all. If that is a concern for you, you can upgrade to the $10 a month plan (that’s for 1,001 to 2,500 subscribers) to have that removed.
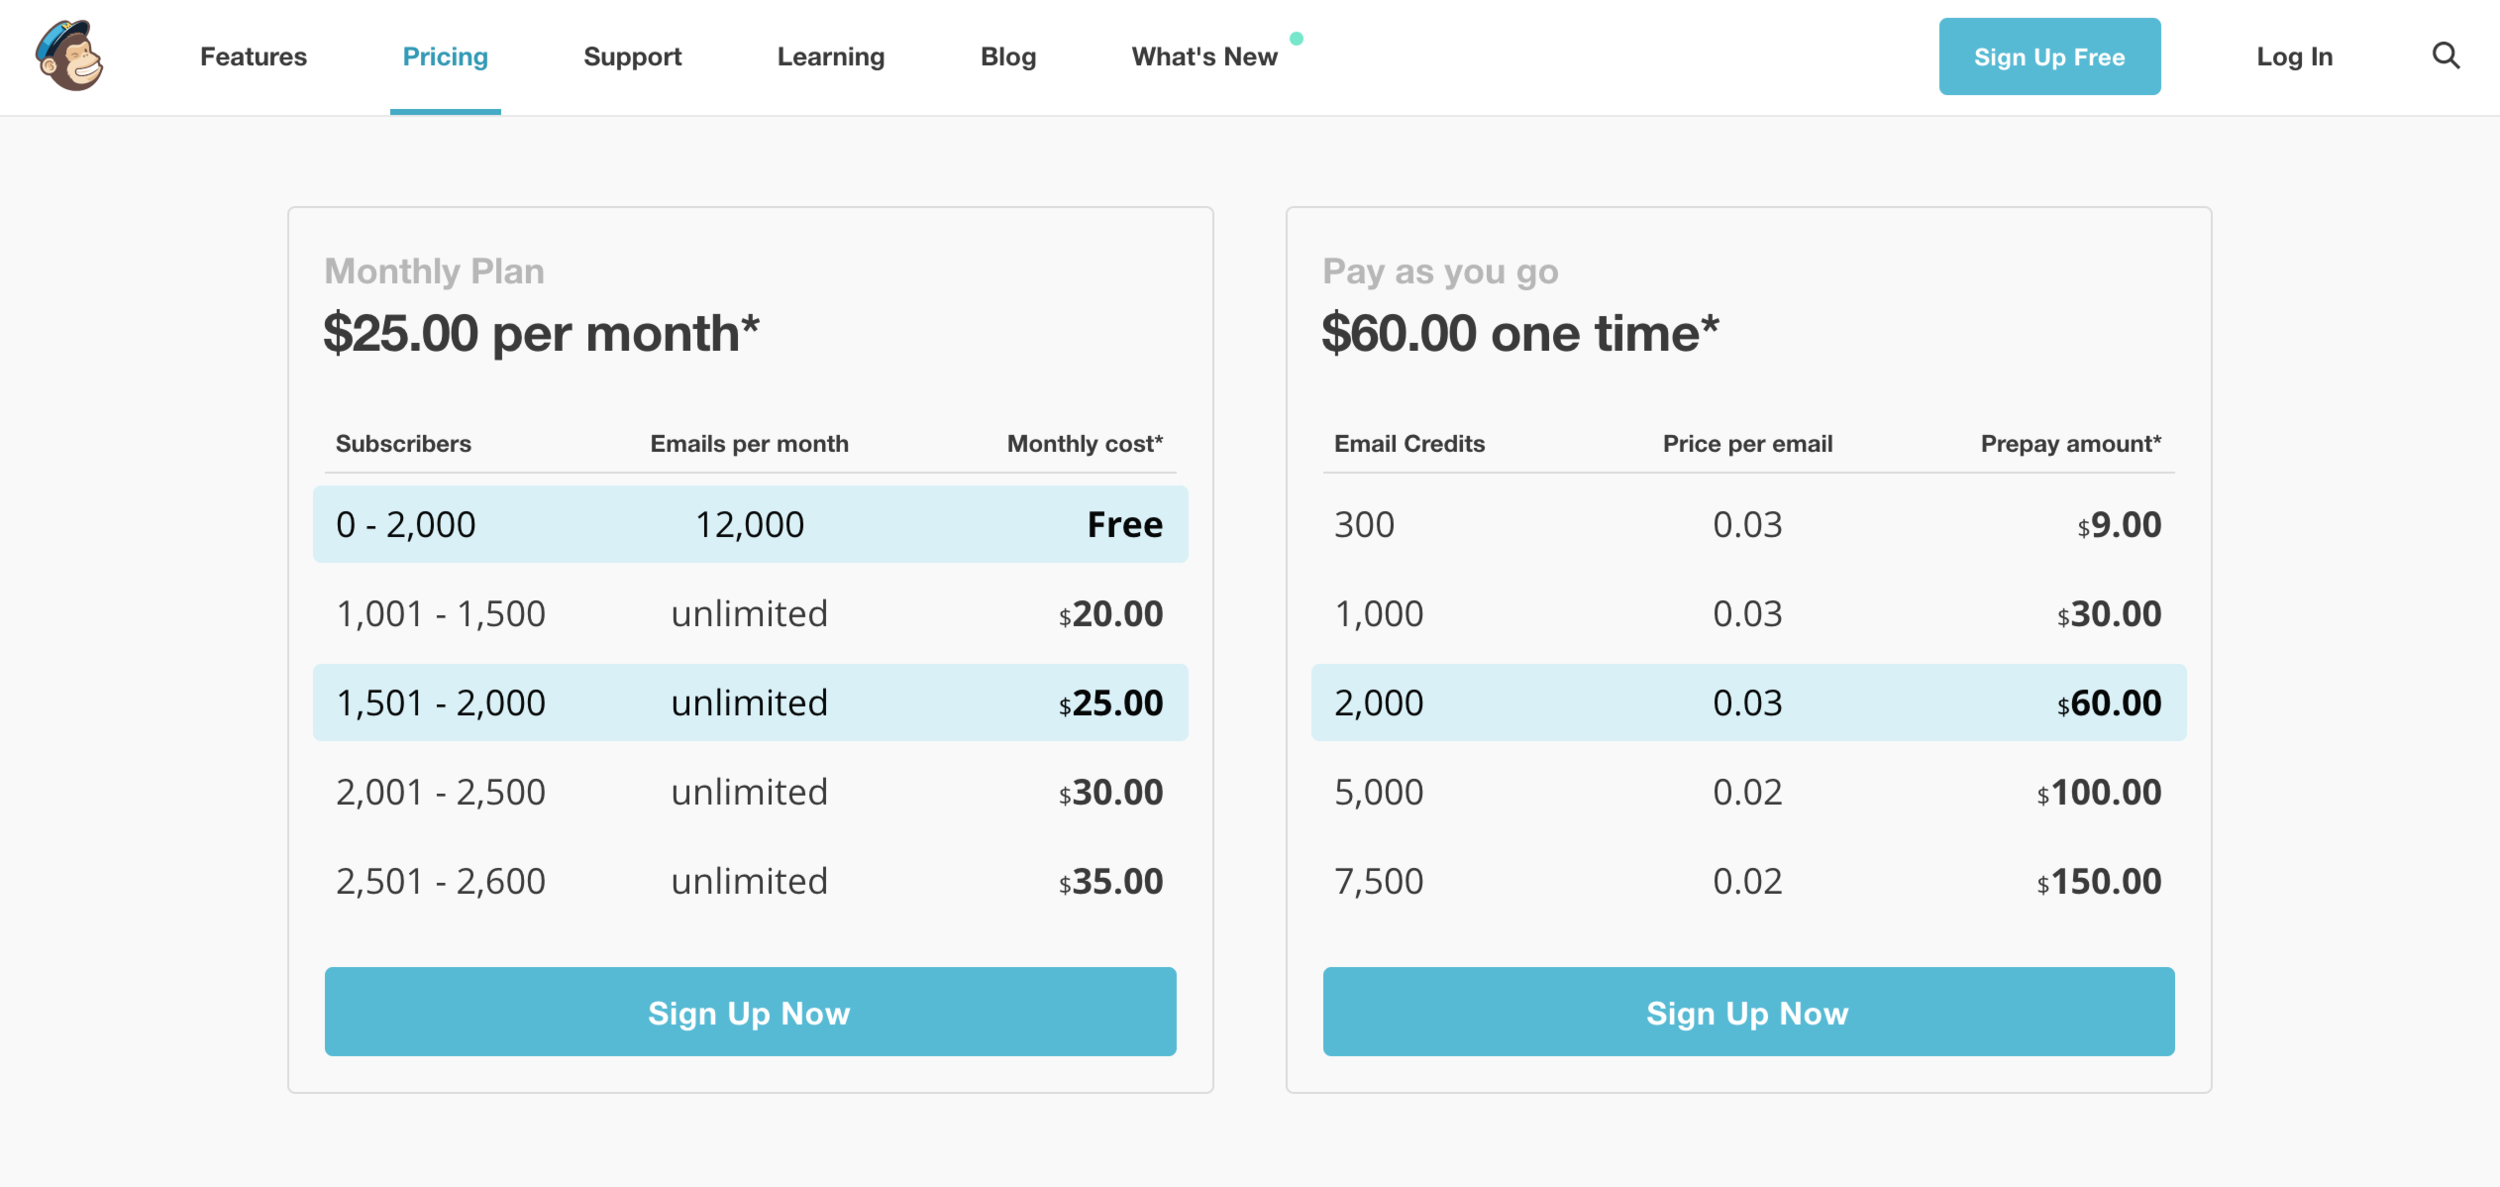
Why MailerLite is More Affordable than Mailchimp
Mailchimp is now all free for under 2000 subscribers, but let’s make note of 2 important things. If someone opt-ins to your list multiple times (let’s say they sign up for a free checklist from you and sign up later to receive a free guide), then they count of 2 subscribers. That makes your list grow faster than it should, plus gives you an unrealistic image of how many people are really on your list.
Plus, Mailchimp does not give you all it’s features for free if you’re under 2000 subscribers. While they have upped their game (to help with all the competition), you can’t send emails by time zone for free (which you CAN do in MailerLite, but not in ConvertKit). You also don’t get easy access customer support, which you CAN do in MailerLite (I used the free chat feature even while writing this post).
Why MailerLite is More Affordable than ConvertKit
There’s almost no comparison when it comes to cost between MailerLite and ConvertKit. Though sometimes you’re able to use someone’s code to get a free month of use, after that you pay $29 a month for under 1000 email subscribers. Depending on your niche and how aggressively you try to build your list, it could take you a long time to build up to that. Plus, once you go over 1000 subscribers it jumps to $49 a month! You could run your whole side hustle with that amount!
*See Related: How to Run Your Side Hustle for Under $50 a Month


The Customization Benefits of MailerLite
In MailerLite there are so many ways that you’re able to customize it’s available features to make in “on brand” with your business. From the words you choose, to the colors, to the layouts of your emails and landing pages. Here’s an overview of some of my favorite MailerLite customizable capabilities.
MailerLite’s Customizable Themed Templates
Because MailerLite offers so many visual options so that it can match your brand to the “T”, it would be a lot to recreate that for each form or email that you send. Because of that, you’re able to create your own branded themes inside of MailerLite.
It already comes with a large set of preloaded themes, but I like that fact that you can create several of your own. This could be useful if you have an email course that’s branded differently from your main email list. Or if you have 2 seperate lists like I do (one for side hustlers and one for travelers).

MailerLite’s Customizable Unsubscribe Page Templates
Even though it may not feel good when someone unsubscribes from you list, it’s a fact that someone at sometime undoubtedly will. When they do you’ll want to leave one final great brand impression and also make the experience easy on them. In MailerLite you’re able to customize your unsubscribe page. On this page you’re can change the background image, the wording that you use, and display a “yes” or “no” button.
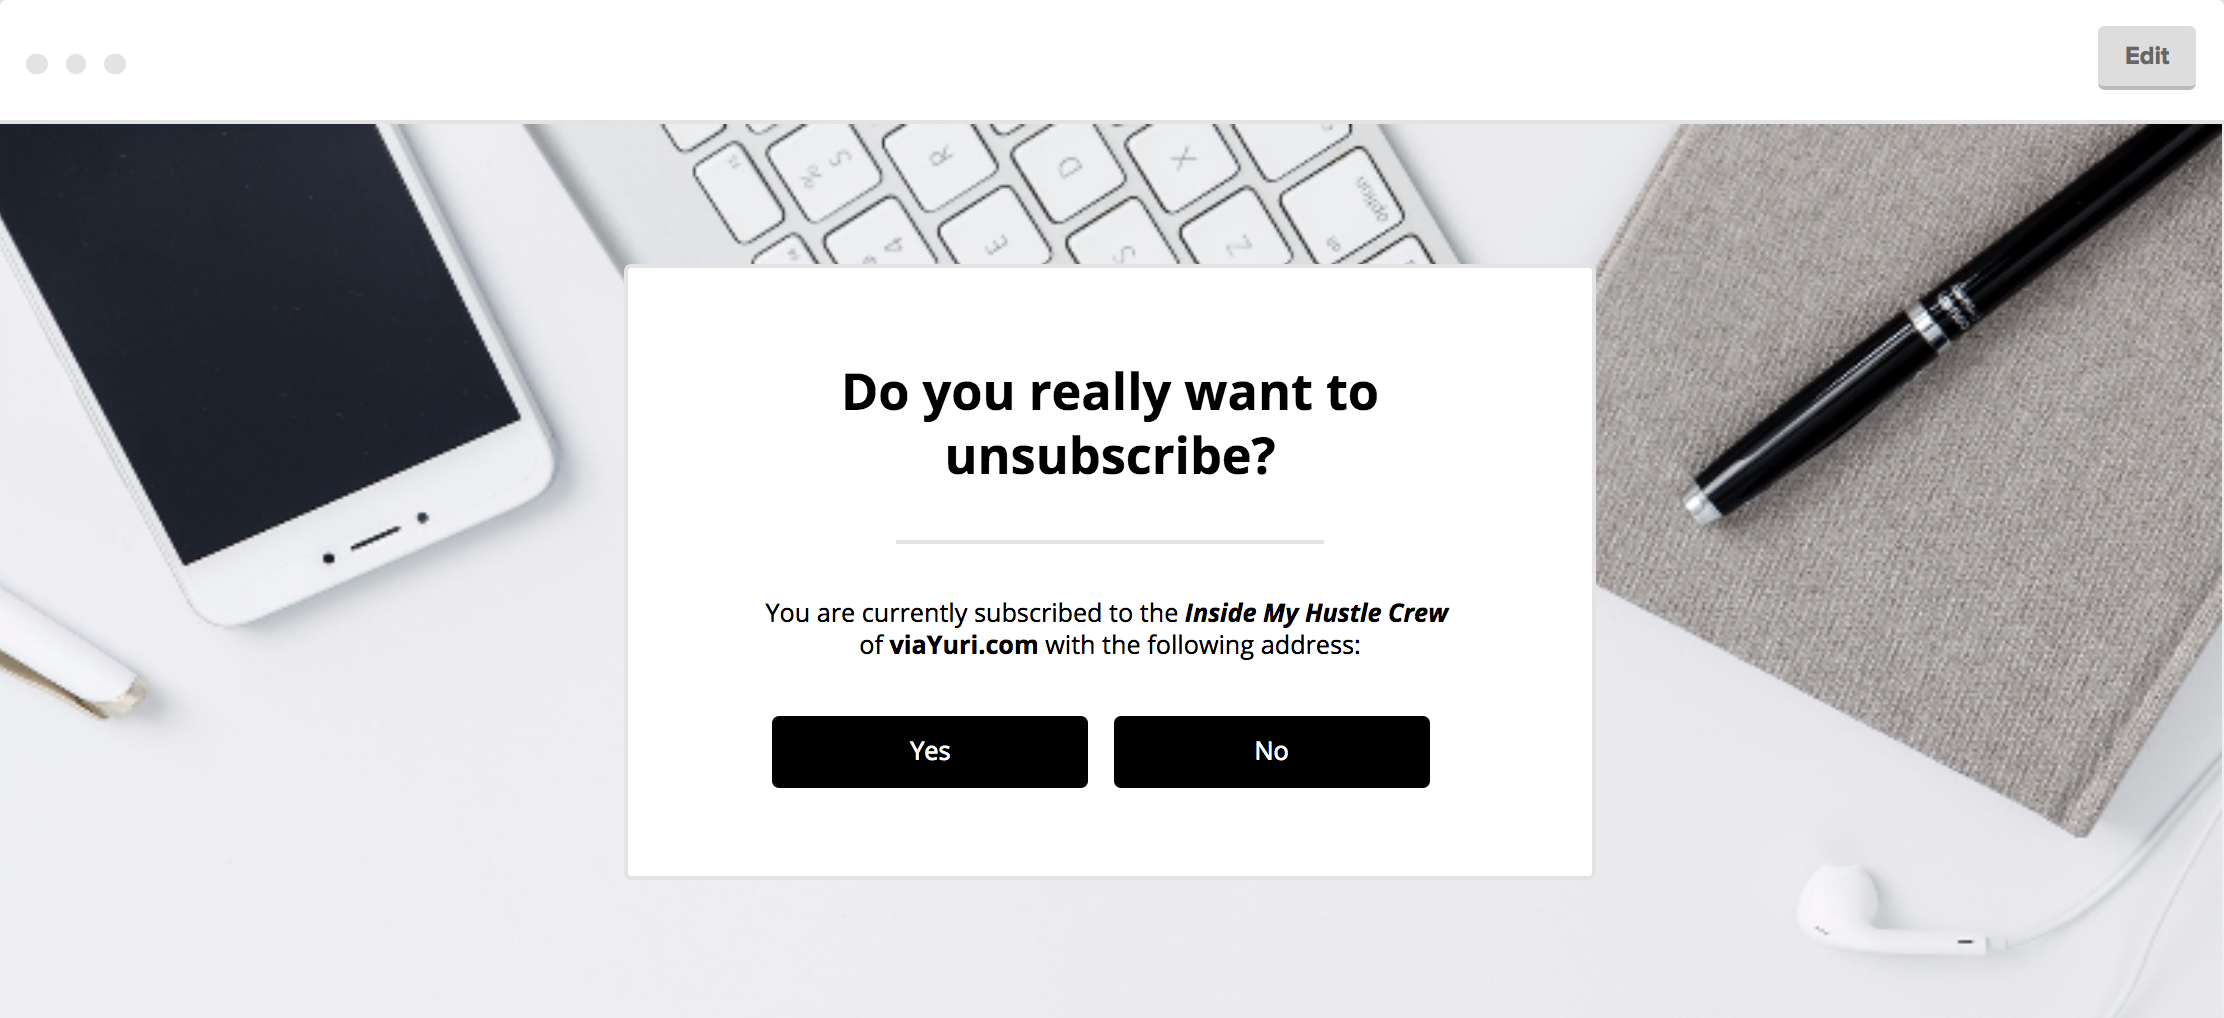
In addition, you’ll want to find out why they decided to unsubscribe. In MailerLite, if someone selects yes to unsubscribe, they’re then directed to a page to fill out their reason for doing so. Currently you can’t edit the reasons, but they still can provide some good data.

One thing that (again as a designer) I didn’t like about Convertkit was the fact that all unsubscribe pages look the same. I periodically unsubscribe from different email newsletters just to clean up my inbox a bit. It doesn’t leave a great brand impression because it reminds you that’s it’s a tool that you’re interacting with, not an actual person or brand.
MailerLite’s Customizable Buttons (that you can add directly inside of emails!)
We already talked about how conversions increase with clickable buttons. With ConvertKit, if you’d like to add a button, you currently have to switch over to code mode and add code that you also have to alter to fit your exact text and brand colors.
In MailerLite, you can easily add buttons to any email or any landing page. Not to mention, you can add clickable email sign up buttons directly to your website (we’ll talk about that more in the next section :). Overall, the ability to add buttons virtually anywhere is one of my FAVORITE features of MailerLite.
MailerLite’s Customizable Images
One of ConvertKit’s biggest things, is that they don’t encourage you to add images to your emails because they say they may end up in spam folders. But personally, images and icons are a HUGE part of my brand. They’re how I express myself and get a point across quickly and easily (just take a look at my start here page).
To not end up in spam, MailerLite takes another approach. So because of that I’m able to customize my email templates the way I like! I try not to go overboard, and I encourage you not to as well.
Another great thing about the ability to easily add images in MailerLite, is that they actually provide an image library! They call it the file manager and there I keep images in folders that range from Profile Pics to Blog Post Images.

MailerLite Gives You the Ability to Add a Personal Touch
When I designed brand identities for others, one thing that was included with all my packages was an email banner image. It usually featured an image of my client plus the name of their newsletter with one of their business taglines.
While you could pay a designer to create one for you (or design one yourself), you can simply just add a professional picture of you with your tagline inside of MailerLite, which is exactly what I do.

In addition, I also end every email with a small picture of me to help reinforce that anyone who receives an email from me is interacting with a real person. Plus, it always helps to put a face to a name :)

The Competitive Features of MailerLite
MailerLite has some outstanding competitive features that range from automation to email opt-ins, to customer service and integrations. These features are what combine the best of both worlds from ConvertKit and Leadpages. In addition to allowing my emails to look “on brand”, MailerLite also has several key features that allow it seamlessly integrate with my website! Here is an overview of why MailerLite has the competitive edge for bloggers, side hustlers, and small business owners.
You Can Create Clickable Email Pop-Up Boxes inside of MailerLite
One of the main features that attracted me to MailerLite was the ability to create clickable email sign up boxes. Research has shown time and again that the use of a CTA button can help convert website browsers into email subscribers. To get that easily (without jumping through several coding loops), the only reasonable solution used to be Leadboxes from Leadpages. But again, paying $37 a month for clickable buttons doesn’t really make sense to me.
I add these buttons to my site using simple code that MailerLite provides. I add my brand colors, choose what the opt-in box will say, and setup the email they’re receive, then I place the buttons on landing pages throughout my site.
To be honest, the clean look of these buttons, their seamless integration into the look of my website, and the (FREE) cost of MailerLite is ultimately why I made the switch from ConvertKit.
*See Related: The Top 10 Content Upgrades, Email Opt-in Freebies, & Lead Magnets to Build Your Email List

You Can Create Email Sign Up Boxes inside of MailerLite
The buttons that you can create in MailerLite are a part of their Embedded Forms. You have 2 options when it comes to creating an Embedded Form. You can create a Subscribe Button (which we just talked about), or you can create a simple Embed Form. On the back end they both operate the same, they just visually look different. Here is an Embed Form that I display in the footer of my website.

You Can Create Beautiful Landing Pages inside of MailerLite
Under the forms tab of MailerLite, you can also create Landing Pages. They currently have 10 templates that you can choose from that are all designed with a different purpose in mind.
Though I don’t use MailerLite for this (again, I use Squarespace), you most definitely can and they make is simple for you to do so.

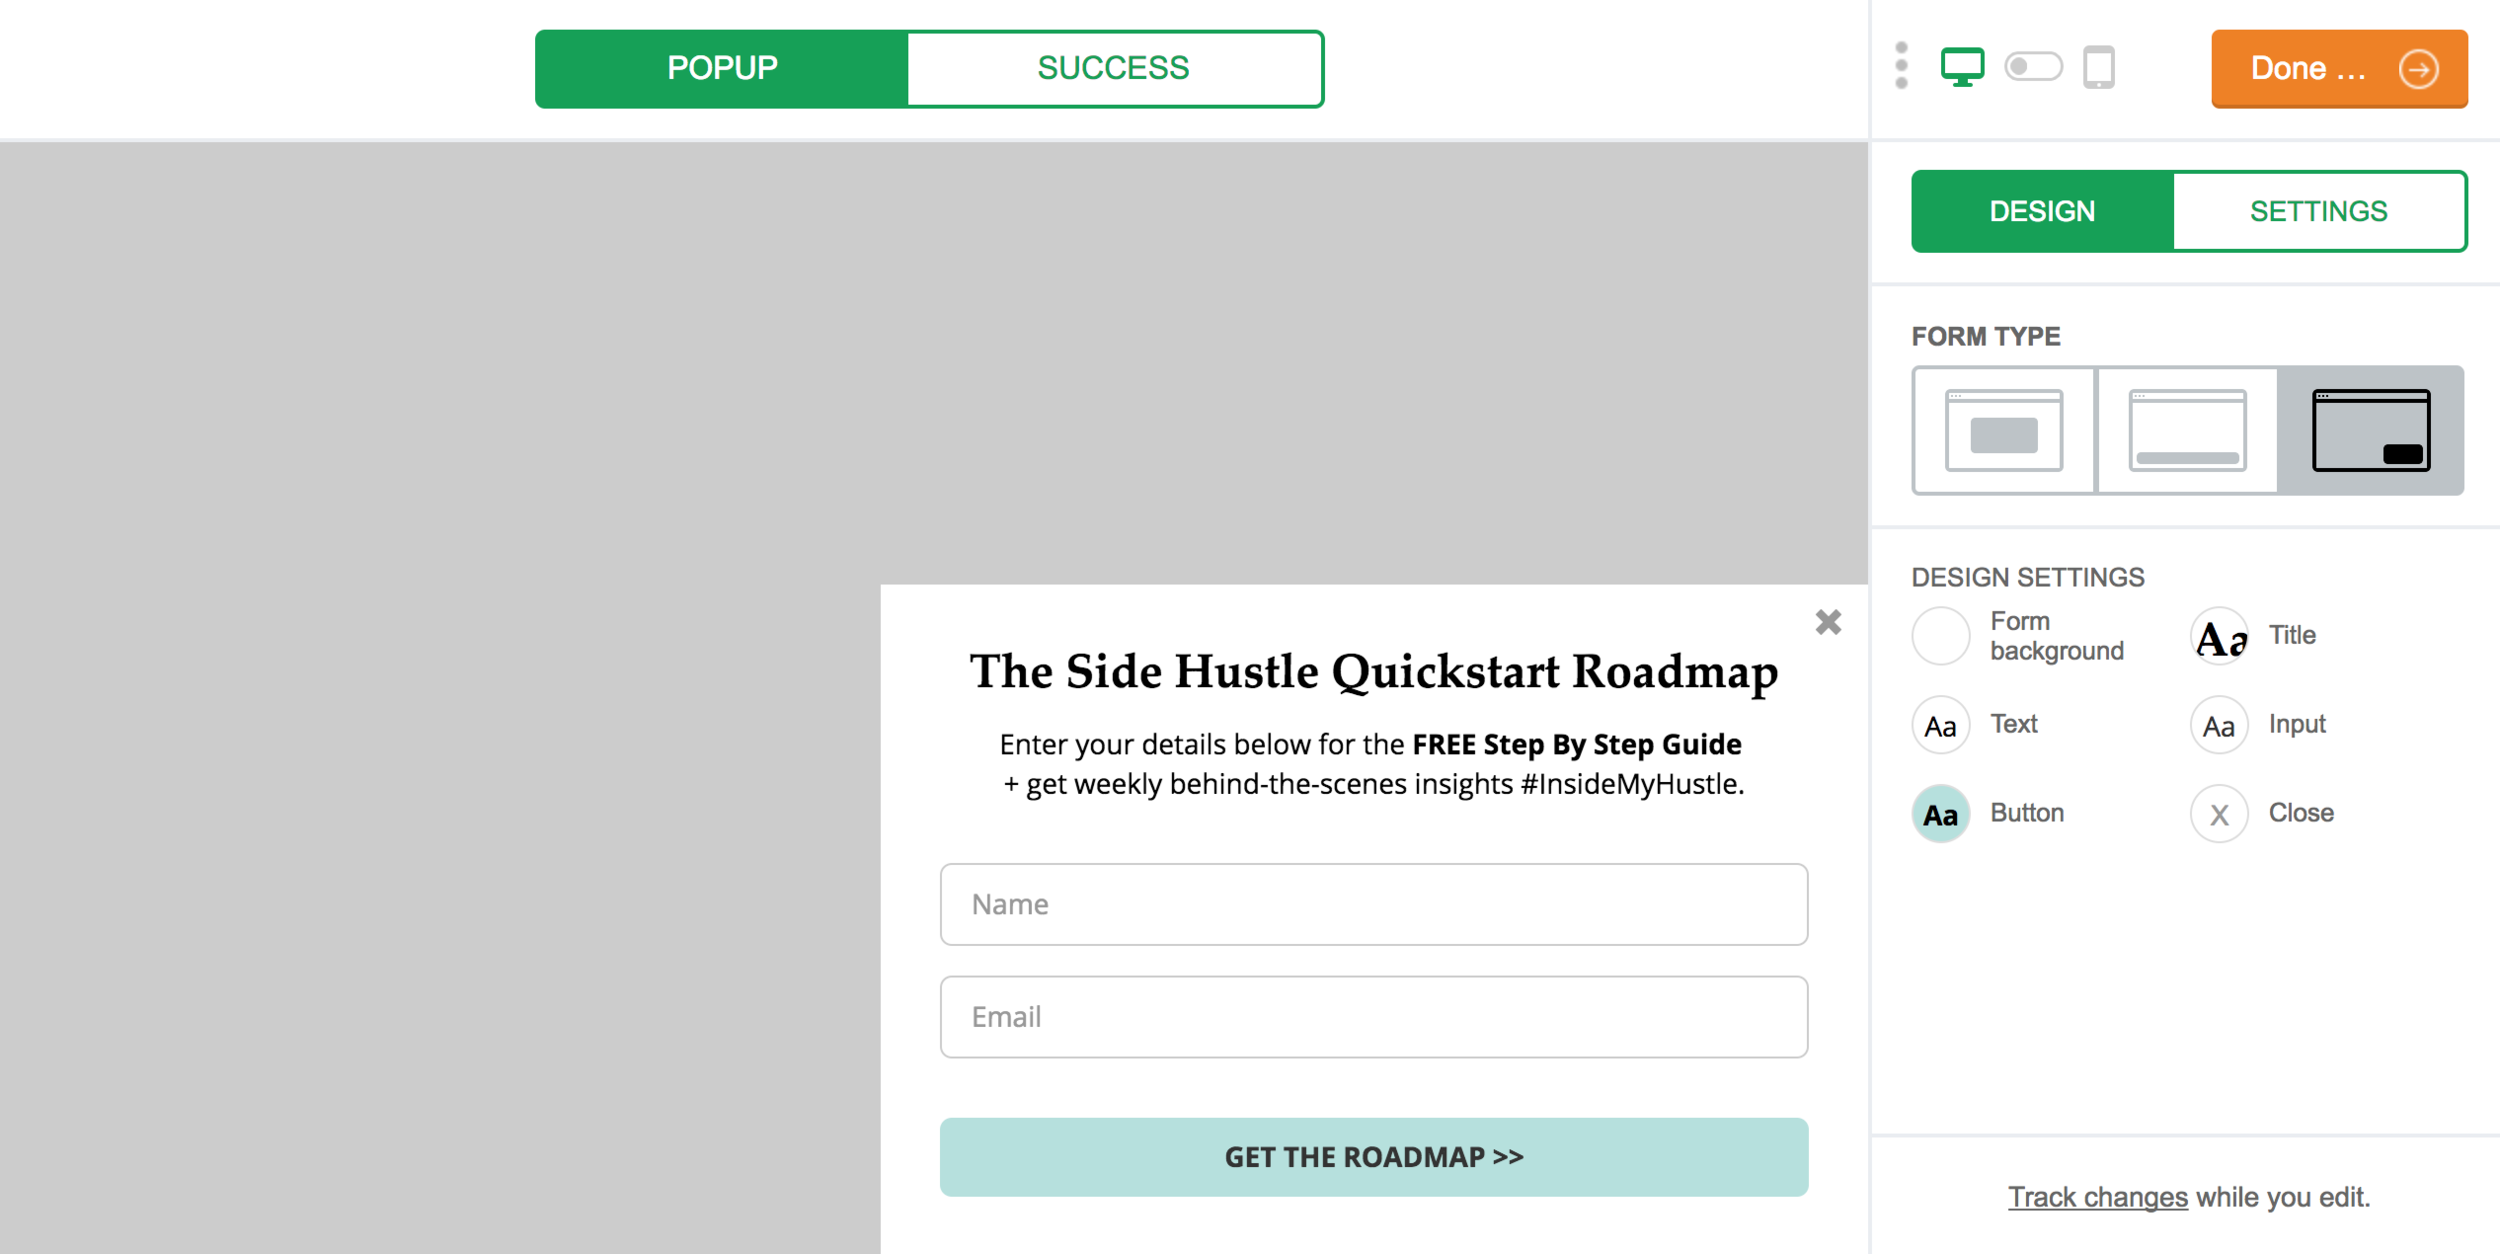
You Can Create Pop Up Boxes inside of MailerLite
In MailerLite, you can also create pop-up boxes on your website. There is research that proves it can be a great way to get others to join your email mailing list. Though I have mixed feelings on this (I’m currently testing one out in a hopefully non-annoying way, lol), it’s nice to know they provide this option if this is something that you’re looking for.
In MailerLite you can have sitewide pop-ups that appear in the middle of your screen, the button of your screen or slide in from the side.
You can also control if they only appear on certain pages, or delay when they appear. These are nice features, and are what have convinced me to give it a try.
You Can Create Countdown Timers inside of MailerLite

MailerLite allows you to add countdown timers to emails and even to your landing pages. This feature can be useful if you’re running a limited time offer on a product of service. This could also be used as a countdown timer to a launch a new site, product or service as well. This alone could replace the need for Leadpages and Motion Mail in your business.
You also have the ability to add videos, dividers, galleries, special links to products, and more.
You Can Create Email Automation Sequences inside of MailerLite
Automations are quickly becoming a standard for online email marketing. Automations are automated emails, triggers, and actions that can happen when someone interacts with any of your forms that you created inside of MailerLite.
For example, when someone enters their name and email address to download that awesome freebie you created, they have essentially “opted in” to your email list. You can then attach a welcome email series to breiflly share with them more relevant content and get to know you a little better.
In ConvertKit they call these sequences, but in MailerLite they’re called Automations. But they operate the same way. There are many other ways you can utilize Email Automation within your business, but this is the most basic method that I recommend starting out with
You Can Add Your Social Media Links inside of MailerLite
MailerLite allows you to easily add links to your various social media media platforms. Fill it in once, and it populates every time you include that block. You can also choose how these icons are displayed as well as the size.
I personally like this feature because it acts as a subtle visual reminder that your subscribers can connect with you on other outlets.


You Can Use Recent Emails & Automated Emails as Templates inside of MailerLite
Every time you send an email, that’s not automated to your list, it’s called a campaign. Campaigns are what you’ll use when sending out your weekly/monthly emails to your list. When creating an email campaign inside of MailerLite, you have three formatting options.
You can create your own template using MailerLite’s drag & drop editor.
You can use one of MailerLite’s email templates. The cool thing about this is that they offer seasonal templates in addition to their regular templates that range from product announcements to surveys.
You can use your recent emails that you’ve sent with MailerLite, or even use the emails your created inside of your automations. This is typically what I select to once again help reinforce brand consistency.


MailerLite is a Subscriber Based System
One of the best features of ConvertKit is that it is considered a “Subscriber Based” platform. This means that you can really gear everything you do towards the personal preferences of individual email subscribers. Someone opted in to your list to learn more about the book you’re releasing? You can send them exclusive emails. Someone clicked on a link to learn more about business branding? Add a tag to that subscribers so you know to send them more information on that later, so add them to an automated sequence that covers that specific tops.
Though MailerLite’s system is set up slightly differently, you have the option to do these inside their program as well! I set up different groups and segments depending on what content upgrade, lead magnet, or webinar they opted into my list through. The only thing you can’t do easily in MailerLite (that you can in ConvertKit), is create link triggers - meaning adding a special tag when someone clicks on a special link that you set up. But because MailerLite is a program that’s ever evolving, I think (and hope) they will make it even more straightforward to do this soon.
MailerLite Integrates with Other Platforms
I think that everyone knows by now that I proudly use Squarespace to design and create my site. I connect MailerLite to Squarespace through the code block. There is also a workaround for adding MailerLite to your Squarespace forms as well.
MailerLite also integrates with SendOwl, Shopify, Facebook (add a subscription tab to your Facebook Page!), Wordpress, OptinMonster, Sumo, and more!
MailerLite has Live Chat for ALL Pricing Plans (including free!)
This is a HUGE selling feature that is now common with most online tools. Mailchimp doesn’t give you this option with the free plan, but MailerLite doe! In fact, while writing this post I asked a few questions for clarification and got them all answered within 5 minutes of reaching out!
MailerLite also has an extensive video tutorial collection and knowledge database which will answer most questions that you have. You can check it out here.
MailerLite has an Affiliate Program
Like most online tools, MailerLite offers its own affiliate program. It’s a 30% commision of every sale. Though that’s a great percentage, keep in mind that anyone under 1000 subscribers is on a free plan. And once they reach over that amount, they’re only paying $10 a month. That’s a great price point for us business owners, but it is only a $3 commission. But remember that is $3 in relatively passive income.
The good thing is that if that same person later upgrades to the next tier (having over 2,501 email subscribers), you’ll then get an additional 30% commission. So you made $3 off their first upgrade, then an additional $6 off of their second. This totals $9. Though this could take some time to earn, you’re sharing a product that you use because you LOVE IT, and you’re not promoting just because of the affiliate commission you’ll get. In the end it’s about building and earning trust and not abusing the power this online world gives us. Or at least, that’s my take.
So though you don’t earn as high as other programs, don’t forget you’re still saving yourself a truckload of money each month. You can learn more about their affiliate program here. Or you can personally ask them during a live chat (like I did!).
The Cons of MailerLite
This wouldn’t be an honest review, if I didn’t mention the cons that I’ve personally found with MailerLite.
Can’t Make Most Buttons Bold Text
Though this is a small thing, I wish that you could make the button text bolded. If I could do this (maybe they’ll add it one day?!), buttons & forms would be PERFECT!!! Of course you have the ability to choose your own text, so maybe this won’t be much of a concern for you.
MY MAILERLITE SOLUTION:
I just choose an available text that I like in a regular line weight and put it all in caps so that it stands out. I also try keep my text concise so that it’s not overwhelming to read.
So Many Options
Choice is a great thing, but sometimes it can stop you from making a decision or continuing with a process. In MailerLite, when you’re setting up forms you have to first set up the Button, then Pop-up Form, then the Confirmation Email, and finally the Confirmation Thank You Page. This is great because you have your hand in the entire design and flow (which is one of the best features), but it can also be overwhelming.
MY MAILERLITE SOLUTION:
My advice is to set your template once, take your time playing around with it, and then stick to it. Then just continue to duplicate that form or landing page EVERY time you create a new one. This way you keep your branding consistent and only have to go through that design process one.
Adding Attachments
This is perhaps my biggest con, but it comes with good reason. One of the main reasons I love MailerLite is its ability to send multiple content upgrades, email opt-ins, and lead magnets easily.
Can’t just attach a PDF. Check out this tutorial here on how to do it.
MY MAILERLITE SOLUTION:
I went through some trial and error with this. If you’d like to see my best solution check out this post here.
Adding Your Business Mailing Address in MailerLite
Add the bottom of each form and campaign email is a section for you to add your business email address. Keep in mind that EVERY email that’s for commercial use (which your blog, side hustle, or small business most definitely is) is required to display in every email because of the federal CAN- SPAM Act. The con to this is that if your business address ever changes, you’d have to manually go into each opt-in and update the address.
MY MAILERLITE SOLUTION:
Again, my advice is to create something the right way once, and just continue to duplicate it. When it comes to sending email campaigns to your list on a frequent basis, just select the option to create from a recent email so you never have to type it again.
My Final Thoughts on MailerLite
While no program is completely perfect, MailerLite takes the cake in terms of cost, customization, and features and I think any starting blogger, side hustler, or small business owner should choose this as their email provider.
If you’d like to check it out for yourself, click here.
Hope this was helpful. That's all for today. Until the next time...
via,
Yuri


